

Chalk & Paint Thread Painted Mini Quilt!
![]()
I was excited to find out that I was chosen to participate in the Chalk & Paint blog tour to showcase Sew Caroline’s newest fabric collection Chalk & Paint. I have always admired the vibrancy and whimsy that shines through in her fabric design and clothes patterns.
I fell in love with the Sprightly color way because of the mix of soft pastels and pops of bright colors, and I knew this was the perfect color way to show off my mini quilt.
 When I began designing this mini I challenged myself to go outside my box, to not just create a traditional mini quilt that consisted of perfectly symmetrical borders in a square shape, but to embrace the modern style and leave my comfort zone. I really took into consideration Sew Caroline’s inspiration of street art and tried to encompass that essence throughout my design. I knew I wanted to delve into mixed medias and improv quilting.
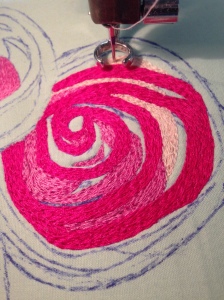

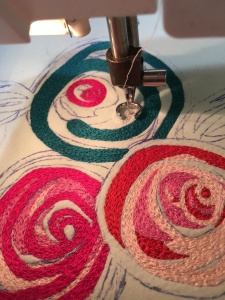


I started by capturing the circular motion and fluidity you feel from the Sprayed Blooms print and translating that into a fun and whimsical thread painting. To create the same motion in the thread painting I actually applied the thread in the exact same motion your eye follows, so that if you look closely the thread flows in the same direction as the pattern. I used Aurifil 50 wt thread for the thread painting!

I decided to showcase the hydrangea using cutouts from a variety of Chalk & Paint fabrics for the petals. I loved how the mix of fabrics in the hydrangea paired so well with calming solids in the thread painting.


For the background I really wanted to keep it subdued and modern but with a twist, so I chose to add improv chunks of the Writings on Walls print and coordinating AGF solids. (This was way outside my comfort zone!) I thought the solids would keep the background subtle, yet the text print (which I love!) would add unexpected pops of texture.


So my favorite part of the whole design might be surprising but it was not the thread painting! My favorite design element was the triangles.

From the moment I saw the Triangle Brush Varnish print I knew I had to figure out a way to recreate that into a block. I decided to paper piece tiny strips of the Chalk and Paint fabrics to make the triangles.


I wanted the triangles to look as if they were falling off the edges of the mini quilt. Some of the triangles I left whole to truly show off the gorgeous fabric, while others were chopped and pieced to appear floating. (If you look closely you will actually see a few triangles that are made of Chalk & Paint selvages.)


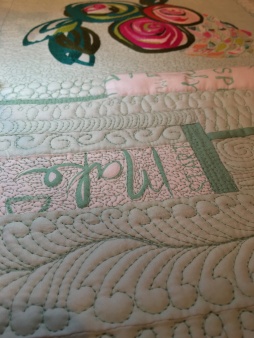

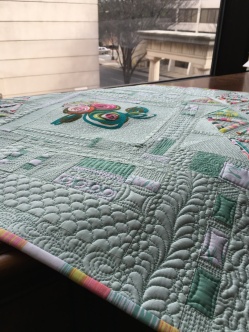
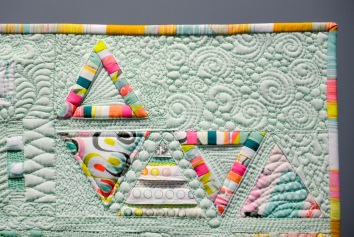
For my quilting I stuck with the freeform, street art theme and did my version of graffiti quilting. The improv piecing created many seams and intersections in the background, so I decided to enhance that by free motion quilting a different design in each space. I decided to leave a few blocks and triangles unquilted to add dimension. I quilted he mini with Aurifil 50 wt thread.


To finish off the Chalk & Paint mini quilt and tie all the elements together I bound it in the Dripping Paint print (stripe binding of course!). The mini is roughly 24 inches by 26 inches finished.
Here are a few extra photos of the mini hanging by street art, I am not sure what could be more perfect. (Don’t you just love the gum ball machine!)


I am thrilled with my finished mini quilt! Now what will you be inspired to make?

Check out the other stops on the Chalk & Paint Blog Tour for your inspiration!
Cristy Stuhldreher http://www.iloveyousew.com
Katie Skoog http://www.TheSimpleLifeCompany.com/blog
Jenn Thurston http://www.quiltedthimblecottage.com/blogs/quilts-and-conversations
Robin Hill http://www.patternrevolution.com
Alicia Bruce http://www.loveknotphoto.com/blog
Holly Hughes http://www.hollygetsquilty.com
Christopher Thompson http://www.thetattooedquilter.com
Alexis Wright http://mysweetsunshinestudio.com/
Adrianna Appl http://www.heyjunehandmade.com
Taylor Urban http://www.taylormadecreates.com
Hayley Crouse http://www.welcometothemousehouse.com

And last but certainly not least..the Instagram GIVEWAY!
Do yo want to win a full Fat Quarter bundle of Sew Caroline’s Chalk & Paint fabric?
Here is how:
• Post/repost on Instagram your favorite image from the blog tour (any photo from any blog post) crediting the maker/photographer OR the giveaway image.
• Use the hashtag #chalkandpaintgiveaway and tag @sewcaroline
• You can enter once per day
Want more info about the giveaway? Go to: sewcaroline.com/2016/02/chalk-and-paint-blog-tour.html
Happy Quilting 🙂
xx Casey

Casey you blow me away! Amazing job on this mini quilt. I love everything about it!
LikeLiked by 1 person
It’s so beautiful! So glad you were selected!
LikeLiked by 1 person
Casey, you did an amazing job! I am so proud of you!
LikeLike
Casey – I found you through your moms IG feed and I’m so happy I did! Your work is phenomenal and so very inspiring! I absolutely ❤️ What you did with this mini. You go girl. I’ll be following !
LikeLiked by 1 person
Big WOW on so many levels! Just downright beautiful and SO creative! So many design elements brought in that just make the whole so lovely. Nicely done!!!
LikeLiked by 1 person
Casey I have no words. I’ve always admired your thread painting but this is an amazing piece of art! It is breathtaking!
LikeLiked by 1 person
What a fantastic quilt. I just love this!
LikeLiked by 1 person
Awesome! I love the textures, and the triangles. Just lovely!
LikeLiked by 1 person
Wow wow wow. I just love this so much. Every last bit.
LikeLiked by 1 person
Great job Casey!
LikeLiked by 1 person
Absolutely beautiful. So many elements together in wonderful combination. You are very talented artist.
LikeLiked by 1 person
Casey, your work is absolutely incredible! I may have a new “crush” on you and the way you thought through the design. Thanks for sharing all the details!! What a treat!!!
LikeLiked by 1 person
SOOOOOO Amazing. Your work is incredible. Thank you so much for sharing! xoxo
LikeLiked by 1 person
Casey: I love your thread painting on the Art Gallery flower print! Can you provide me with any instructions and or pointers on your technique? I love your stitching!!!
LikeLike
Thank you! I have found that Aurifil thread breaks the least and peltex interfacing helps to stabilize the piece. Other than that I would say just don’t go too fast because the thread gets too thick and tends to shred or pop.
LikeLike